Happy Holidays everyone!
Do you find it hard to select "the perfect" gift for your parents or grandparents or even great grandparents (GGs)?
Well, we did too!
After mailing out all of our Christmas Cards, the GGs, indicated how much they loved it and are displaying it for their neighbours to enjoy too.
An idea "POPPED" into my head, of a nixed idea for this year's Christmas Card.
Recognized this pop-up Christmas Tree? Well, mass producing it was nixed, but creating a large one for the GGs, would be perfect!
In lieu of the regular Christmas ornaments, I replaced it with photos of each member of the family. All 4 generations of us, in ornament form. Now they will have all of us around for the holidays, when we can't all be there at once. There's a lot of us now!
Turned out really well. I printed everyone on vellum paper so it would "pop" when a light is shining through.
I also found at the dollar store, these cute mini snowflake LED lights (battery operated). Perfect for the little tree.
Looks great lite up don't you think?
The best things about this Christmas tree is that it collapse flat, perfect for mailing and storing for future use.
The ornaments can be updated and added to as the kids grow and as the family expands more.
I love crafting and I thought I'd share some of my projects here with everyone else!
Showing posts with label Silhouette. Show all posts
Wednesday, December 13, 2017
Monday, December 11, 2017
2017 Selman Christmas Cards
Happy Holidays! Season's Greetings!
Wishing you and your family a wonderful time together!
A full year with TWO boys! Where will I find the time to make Christmas cards? Let's not even get ahead of ourselves here, where will I find the time to design a new Christmas Card? It's going to be impossible!
Of course, never say never!
I started thinking about Christmas cards during the summer. Never stuck to any one idea till literally last month. Then voila, a firm idea, all thanks to Silhouette America Design Store! I love this site...I visit it weekly for free cut designs and on sale cut design. Last month, I discovered a new contributor to the Design Store, Love Pop Card, and low and behold they had an amazing 3D pop up steam engine for purchase.
Anyways, after purchasing the cut file and sending it through my Cameo, the train turned out amazing. Don't let it's intricate detailed design deceive you, it not fragile and was quite easy to assemble. Logan loved it. Grabbed it...popped it open....ran to his room to display it prominently on his bed's headboard shelf.
I toyed around with mass producing the train. Nixed it within minutes. Too many pieces to deal with in the limited time I had at my disposal.
I toyed around with the idea of a Christmas tree. Made two small ones that Logan loved immediately, so he hijacked to be part of his train display in his room. I, however, nixed this idea too. It was just missing something and I didn't really have time to tweak it to my satisfaction for mass producing. However, stay tune for how I did end up using this Christmas idea.
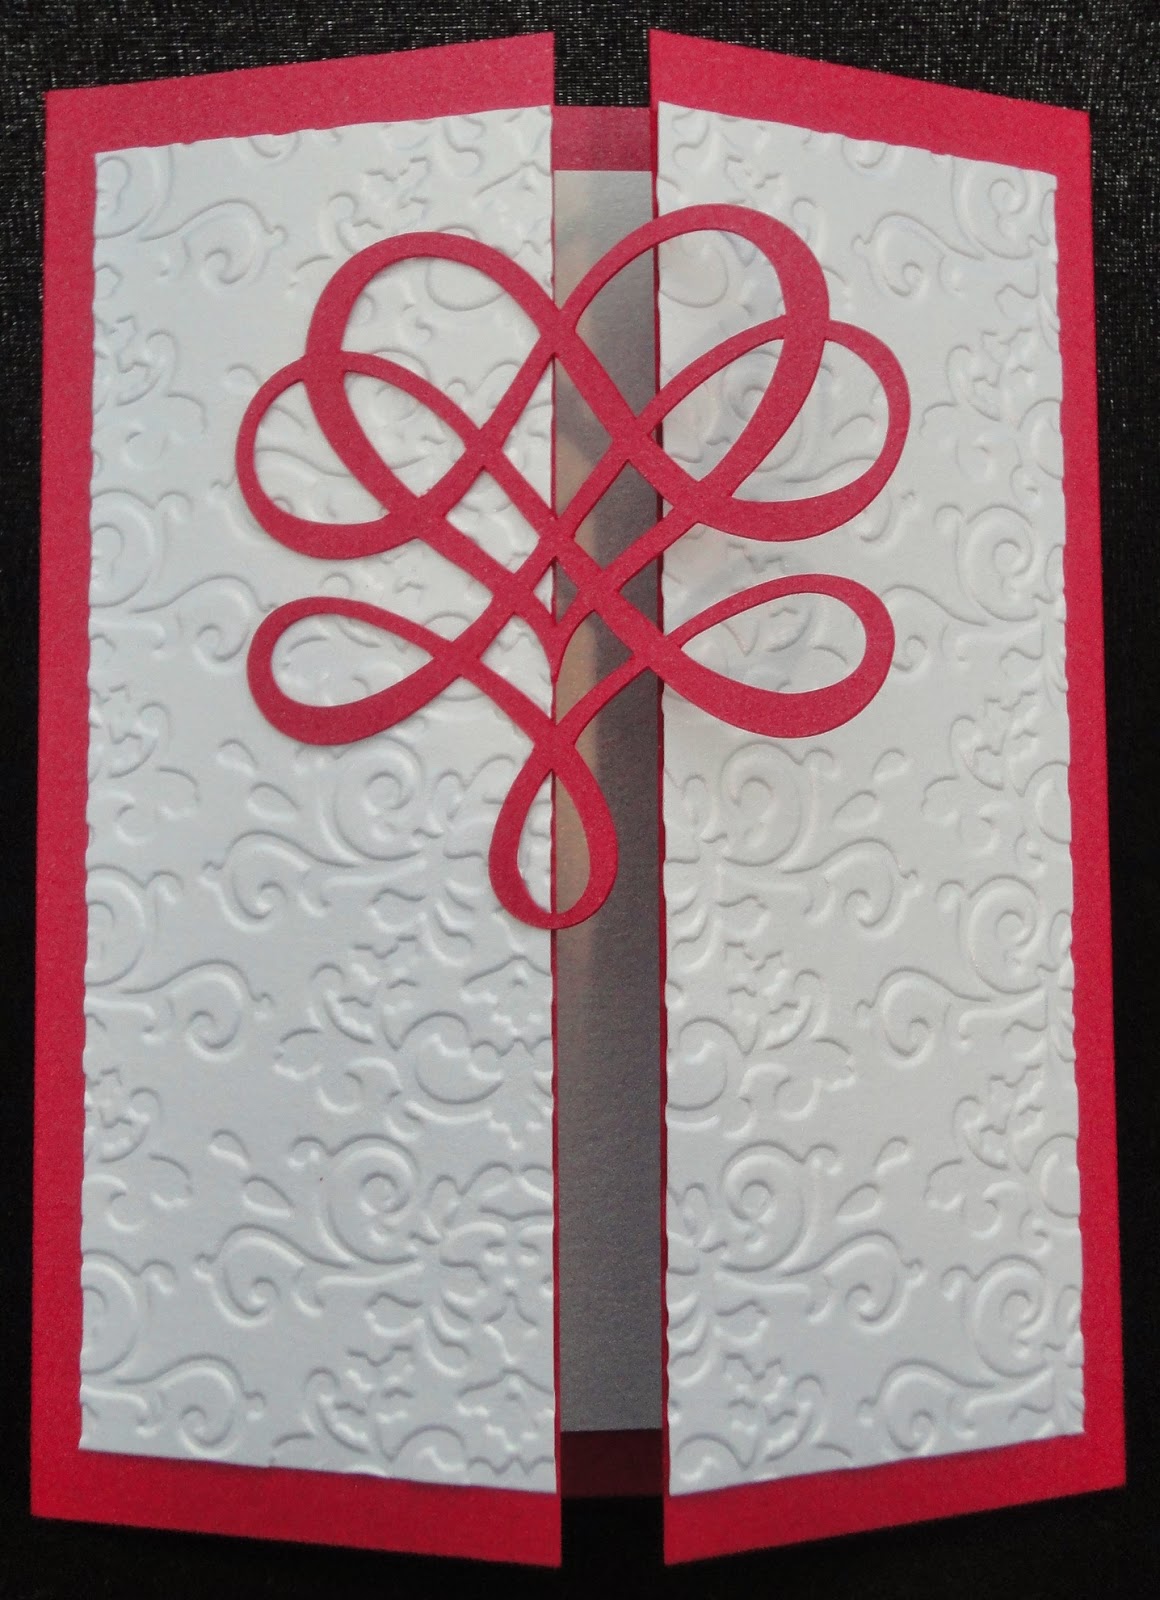
So back to the drawing board. I know I really wanted to make a pop-up card this year. I know, sticking to the family love, it has to represent hockey in some form or another.
Eureka! After doodling and freehand cutting, I got the prototype done of this year's annual Christmas card! I showed Richard for a quick approval, then showed Logan and he loved it and want one for ALL his friends! Eek!
Mass production commenced...
...three separate sets of design pieces were made...
...three separate cuts were run through the Cameo...
...careful assembly took place...
...decorations were designed, cut and added...
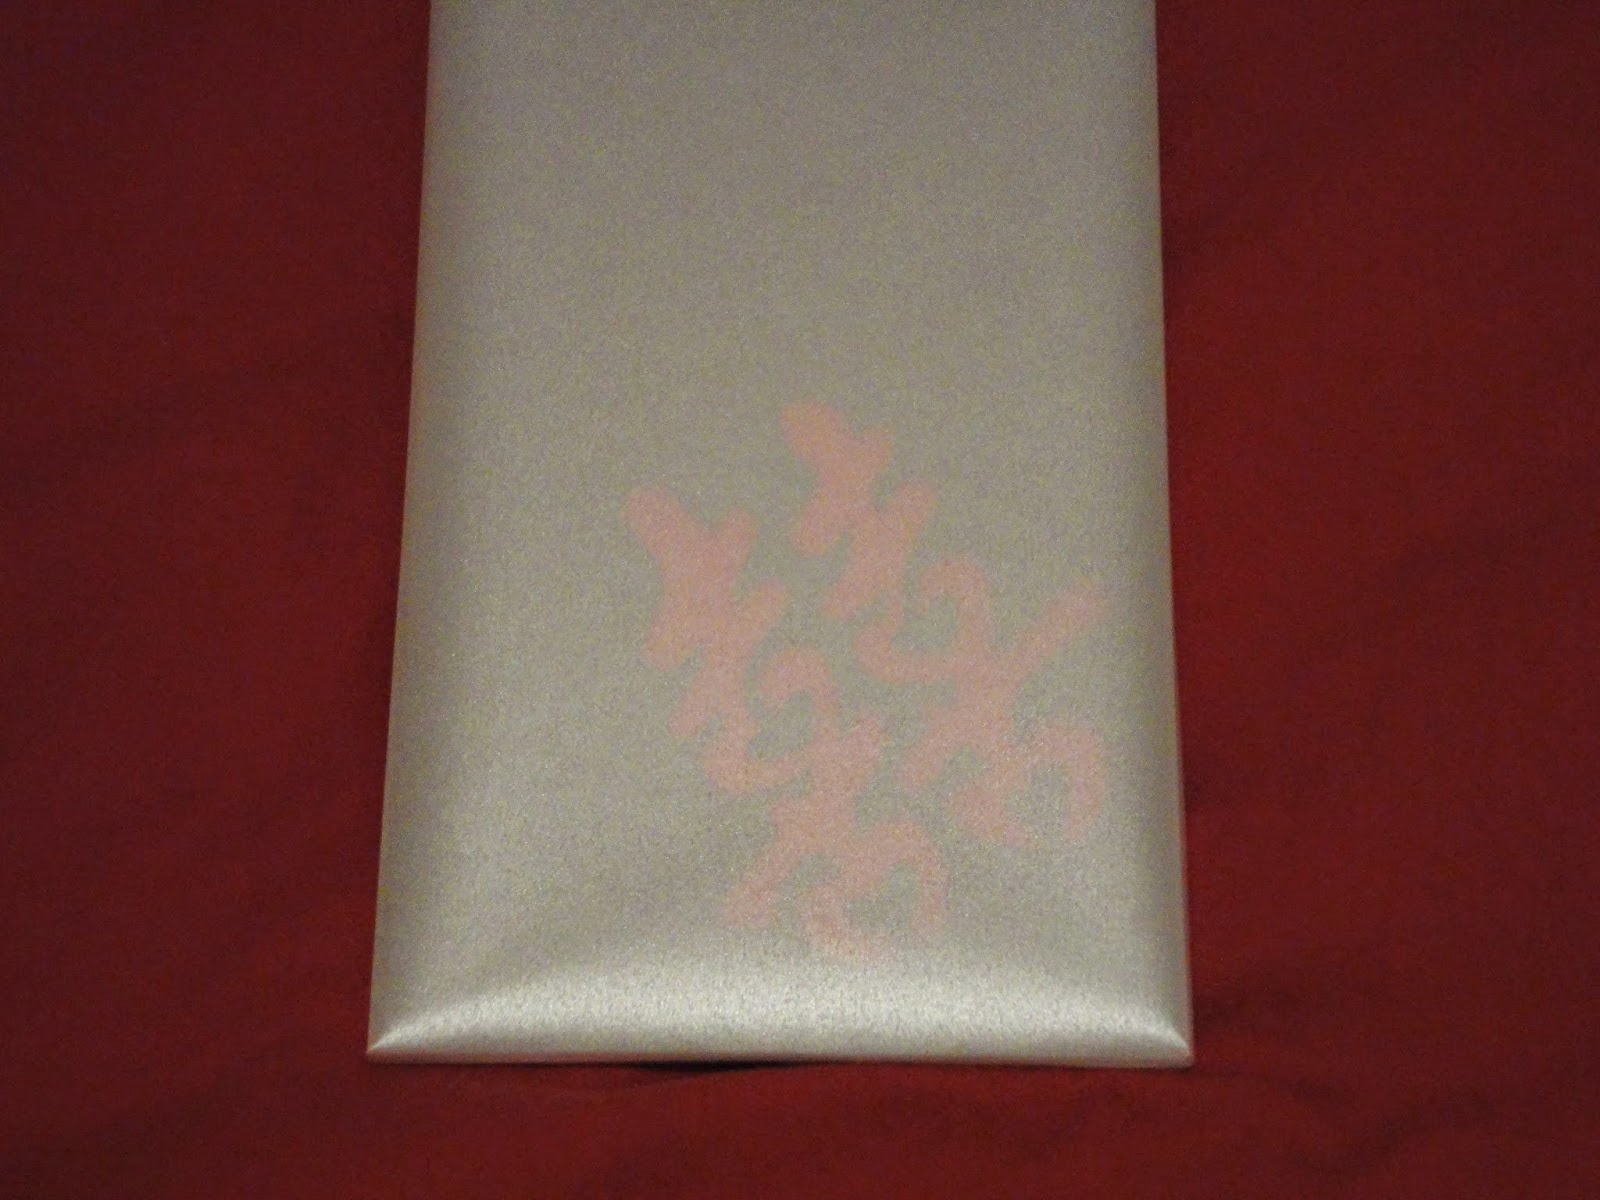
...custom envelopes were made...
...and voila
A hundred cards were made and sent out to a select list of family & friends. I capped myself at a hundred cards or I would never stop making cards!
First batch (with the majority of the cards) were completed and mailed out just before December 1st, just before international delivery deadline! My international recipients started receiving their cards a week after mailing. Woohoo! Talk about good timing!
Tuesday, February 24, 2015
Leland's Birthday Train
For parents who have a Silhouette and have kids who love Thomas the Train...this is for you...
This was a fun project for my godbrother and godsister's son's 2nd birthday...though it was a belated birthday present, since I didn't realise that assembly need just a bit more time than I had allocated...lol
Anyways, I purchased 3 designed from the Silhouette Design Store from the artist SnapDragon Snippers...quite affordable at $2.19 each (cheaper if you are a member or during the sale periods) design file that you keep forever. Here are the links to the 3 different design pieces: Engine, Coal Car, and Carriage.
So when you first purchase the 3 designs, it is for a Christmas themed train, looking like this:
So to start off, how do you get the design above to look like the train at the top of this post? It's actually not too hard, since the designs actually label all the different pieces you need to have cut...and with a little trial and error and help from the SnapDragon Snippers blog, I was able to cut what I needed in the colours that I want to assemble everything in to the theme of Thomas the Train.
With a little modification and custom designing this is what I made:
The Engine with the trim showing the year of the birthday boy's year of birth.
The Coal Car with big Ls for Leland.
And finally the Carriage Car with Leland's name on the side and of course more Ls on the front and back.
So with a little time and patience...you can make yourself a 3 car train...to celebrate a special birthday!
Happy belated 2nd Birthday Leland!
Saturday, February 14, 2015
Valentine's Day
Richard and I don't really celebrate Valentine's Day...but that doesn't mean others don't celebrate...this year, I decided to design some Valentine's Day cards for my co-workers.
And of course, I had to design a few special ones for my hockey players...
Hope you all had a wonderful Valentine's day for all those who celebrated!
And of course, I had to design a few special ones for my hockey players...
Hope you all had a wonderful Valentine's day for all those who celebrated!
Saturday, February 7, 2015
2014 Selman Christmas Cards
It's so hard to stay on top of blogging, but at least I started taking pictures of all the crafting I have been doing.
I always find it daunting to make a large amount of Christmas cards. I especially hate making a large amount of identical Christmas cards since I am hand making them. Kinda boring to make the same one a few dozen times. So, I discovered an alternative to producing a large amount of Christmas cards without redesigning each one, but still making each unique.
Using my lovely Silhouette Cameo, I designed a white Christmas window pane. We have "The Selman", "2014", a snowflake and last, but not least, Richard's favourite Canucks logo in each window pane. I mass produced the window pane. From there, I got to play around with different colour card bases and highlight coloured paper. Some of them I even embossed with Christmas designs using the Big Shot.
I was very happy with the results...same ideas for each, but each still very unique.
Thursday, January 1, 2015
2014 Selman Family Limited Edition Christmas Card
Happy New Year everyone!
I kept this very simple, but with very detailed designs on each panel. Everything you see above was designed using the Silhouette Cameo, except the eyelet at the top for the ribbon.
It might be hard to see, but this year I had SELMAN embedded into the 2014, on the stocking skate.
And of course, there's always a Vancouver Canucks Logo. Go Canucks Go!
How the waterfall card works, is when you pull the ribbon above, the individual pages self flips below.
As you keep pulling, the card flip through the pages, and the greeting panel reveals itself.
I think for next time, I won't make each panel's design so intricate because it was very tedious work adhering it with double-sided tape. (I'm not a fan of glue...I find it too messy and it can damage the nice metallic paper I was using.) That was the reason why I only made a dozen of these cards!
I hope you like this card!
Stay tune for the next post of all the other Christmas Cards I made for 2014.
I hope you all had a wonderful winter holiday.
Did any of you write down any New Year's resolution?
My New Year's resolution involves staying in touch more regularly with my BFF in Ottawa and carving out just a bit more time to craft a bit more, especially now that I have a sewing/embroidery machine!
-----
Did any of you write down any New Year's resolution?
My New Year's resolution involves staying in touch more regularly with my BFF in Ottawa and carving out just a bit more time to craft a bit more, especially now that I have a sewing/embroidery machine!
-----
It's been a while since I last posted, so I'll kick start the year showing off "The Selman Family's 2014 Limited Edition Vancouver Canucks Stocking Skate Waterfall Card"...talk about a mouthful!
I kept this very simple, but with very detailed designs on each panel. Everything you see above was designed using the Silhouette Cameo, except the eyelet at the top for the ribbon.
It might be hard to see, but this year I had SELMAN embedded into the 2014, on the stocking skate.
And of course, there's always a Vancouver Canucks Logo. Go Canucks Go!
How the waterfall card works, is when you pull the ribbon above, the individual pages self flips below.
As you keep pulling, the card flip through the pages, and the greeting panel reveals itself.
I think for next time, I won't make each panel's design so intricate because it was very tedious work adhering it with double-sided tape. (I'm not a fan of glue...I find it too messy and it can damage the nice metallic paper I was using.) That was the reason why I only made a dozen of these cards!
I hope you like this card!
Stay tune for the next post of all the other Christmas Cards I made for 2014.
Sunday, April 13, 2014
My Wedding Invitation
My wedding invitation is a 2 fold 3 dimensional design, with a custom made fitted envelope.
The envelope was made using a platinum vellum, so that it's translucent enough for you to see the wedding logo. The envelope was made using a scoreboard, scissors and sookwang double sided tape.
Before the envelopes were made, each one was printed on my colour printer with the recipient's mailing address and my return address.
This was the wedding invitation all folded up. The real invitation is actually a slightly lighter dark grey. This one was the prototype.
I custom made the logo, modifying the Chinese double happiness symbol so that it has subtle hearts in the symbol. Each invitation would have the logo cut out by my Silhouette SD. My poor baby is going to have to cut over 300 logos...
When you open up the wedding invitation completely, you will have 3 silver panels. Each panel will have the wedding invitation, the translated invitation in Chinese or Vietnamese, and the final panel will have one of our engagement photos.
If you close the far right panel, you will see a red pocket panel. This is where I had information on the reception and direction, the ceremony and direction, accommodations for our out of town guests and limited invitation to the Tea Ceremony. It will also include an RSVP note.
I made, with help from Richard and friends, over 200 personalized invitations.
Subscribe to:
Posts (Atom)


